Issue
You can either receive a ready-to-use card from the administrator or issue a card yourself from an empty one. If your card is already ready to use, you will see all its information when you log in to Self-Service.
Issue a card
The administrator defines the list of issuance options in policy settings. The following steps describe how to issue a card with the maximum set of options.
Connect a card to the workstation.
Click Issue card.
Select certificate templates.
Administrator settings
The user can select certificates if you enable the Select optional certificates when card is issued option in policy settings (Workflow→User permissions→Card issuing operations).
Depending on the administrator settings, the card is either initialized or not initialized when issued.
- Not initialized
- Initialized
- Enter User PIN.
- Enter Admin PIN.
Administrator settings
The Admin PIN field is displayed if the card was not added to Axidian CertiFlow and you enabled the Allow user to add cards when they are issued option in policy settings (Workflow→General).
infoIf you do not set Admin PIN and User PIN, Axidian CertiFlow uses the PIN values specified by the administrator in Card types.
- Click Issue.
- If your card stores third-party certificates, select the certificates to register them in Axidian CertiFlow.
Administrator settings
The user can select certificates if you enable the Search for certificates when card is issued or updated to track validity period and Allow user to select tracked certificates options in policy settings (Workflow→General).
Administrator settings
Enable the Initialize card option in policy settings (Issuance) and configure initialization settings in Issuance→Card initialization.
cautionIf the card is initialized when issued, all data on the card is deleted.
- Enter Admin PIN. If you do not set Admin PIN, Axidian CertiFlow uses the PIN value specified by the administrator in Card types.
Administrator settings
The Admin PIN field is displayed if the card was not added to Axidian CertiFlow and you enabled the Allow user to add cards when they are issued option in policy settings (Workflow→General).
- Click Issue.
If a random PIN was set during the card issue, it is displayed on your screen. If necessary, save your PIN and email it to yourself or your manager.
Administrator settings
A random PIN is set if you enable the Set random user PIN option in policy settings (Issuance).
The PIN value can be sent by email if you configure email notifications.
Click Close.
After you issue a card, it is displayed in Your cards.
Send documents for approval
Card issuance can be suspended if, according to your company's regulations, the certificate is issued only after documents are approved by the CA or the administrator. In the card issue window, you will see the message Card issue pending and the card gets the Pending status.
The administrator defines the document approval settings. For more information, see Administrator guide.
Types of documents
Depending on the regulations, the set of documents varies:
- Certificate request — submitted to the CA for approval. The administrator can precheck the request.
- Certificate — submitted to the administrator for review after the CA approves the certificate.
- Certificate request and certificate — first the CA approves the request, then the administrator reviews the certificate.
How to send documents
Send the documents for the certificate:
- Through Axidian CertiFlow, if the internal document management functionality is configured.
- Outside Axidian CertiFlow, by any other means authorized in your company. For example, by email.
- Through Axidian CertiFlow
- Outside Axidian CertiFlow
To send a document for approval:
Open the card menu and go to the Contents tab.
Open the document:
- For a certificate request — click
 next to the required certificate template.
 - For a certificate — click next to the required certificate template and select Certificate.
- For a certificate request — click
Sign the document. How to sign documents
Repeat steps 2 and 3 for each requested document.
Wait for approval. The certificate status on the Contents tab changes depending on the stage:
- Pending — the request has been submitted, the CA or administrator has not yet made a decision.
- Valid — the CA has approved the request, the certificate is awaiting administrator review.
- Approved — all checks have been passed, the certificate is ready to be written to the card.
When the certificate gets the Approved status, open the card menu and click Resume issuing.
If the request is rejected in the CA, revoke and clear the card or contact the administrator, then start the card issue operation again.
If the administrator rejected a document, correct the errors and re-upload the document to Axidian CertiFlow.
- Provide the administrator with signed documents in accordance with your company’s regulations.
- Wait for approval. On the Contents tab in the card menu, the certificate status changes from Pending to Approved.
- Open the card menu and click Resume issuing.
If the request is rejected, revoke and clear the card or contact the administrator, then start the card issue operation again.
If the administrator configured automatic email notifications, you will receive emails about the progress of approval:
- Document approved — the administrator approved the document.
- Card issue approved — the certificate is ready to be written to the card.
- Card issue rejected — the card issue is rejected.
If notifications are not configured, monitor the certificate status on the Contents tab and the appearance of the Resume issuing option in the card menu.
Issue virtual cards
You can issue the following types of virtual cards in Axidian CertiFlow:
- Registry
- TPM Virtual Smart Card (VSC)
- Windows Hello for Business
- AirCard
- Registry
- TPM Virtual Smart Card
- Windows Hello for Business
- AirCard
Administrator settings
To issue a Registry card:
- Click Issue card.
- Enter the card name.
- In the Card field, select the following:
- Registry - Machine: Registry, to issue a certificate in the local computer certificate store.
- Registry - User: Registry, to issue the certificate in the current user’s certificate store.
- Click Issue. Axidian CertiFlow sends the certificate request to the CA.
- Create a password for the private key container in the RSA private key creation window.
This is required if the administrator has enabled the Prompt the user during enrollment and require user input when the private key is used option on the Request Handling tab in the Microsoft CA Certificate Template settings.- Click Select security level and enter a password that meets your company’s security requirements.
- Click Finish and OK.
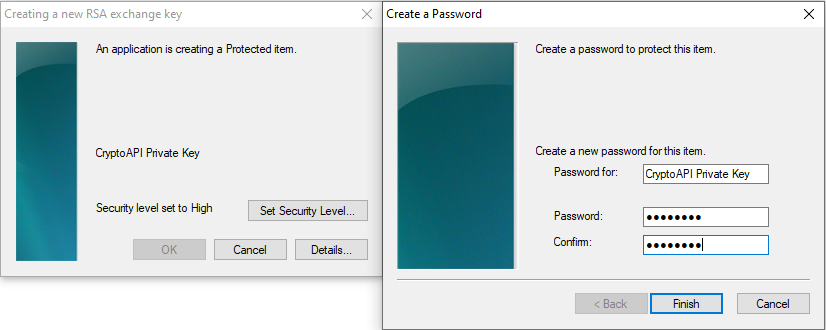
It is not possible to reset the key container password. If you do not remember the key container password, issue the certificate again.
Administrator settings
- Open the Axidian CertiFlow Configuration Wizard, go to Common features and enable the Create TPM Virtual Smart Card (VSC) option.
- Add the Tpm.xml card type to Axidian CertiFlow.
To be able to unlock the TPM card, when you add a card type in Axidian CertiFlow, the administrator PIN must change to random or any non-random Triple DES.
- Install the Trusted Platform Module (2.0) on user workstations.
- Install the AxidianCertiFlow.TPM.Middleware component on user workstations.
- Only RSA certificates are supported
- Card initialization is not supported
To issue a TPM VSC card:
- Click Issue card.
- Enter the card name.
- Select Create a TPM or select a card created before.
- Click Issue.
Axidian CertiFlow creates a virtual card. The TPM virtual card can be used as a hardware card on user workstations. For example, for domain authentication.
Administrator settings
- Deploy the Windows Hello for Business infrastructure according to Microsoft instructions.
- Open the Axidian CertiFlow Configuration Wizard, go to Common features and enable the Create Windows Hello for Business.
- Add the Whfb.xml card type to Axidian CertiFlow.
- Install the Trusted Platform Module (2.0) on user workstations.
- Install the AxidianCertiFlow.WHfB.Middleware component on user workstations.
- Only RSA 2048 certificates are supported
- Maximum number of WHfB cards on a Windows 10 computer is 10
- Only one WHfB card can be created for one user on one workstation
- Card initialization is not supported
To issue a Windows Hello for Business card:
- Click Issue card.
- Enter the card name.
- Click Create WHfB.
- Click Issue.
- Configure card PIN settings:
- Click Set up PIN.
- Enter the credentials for the main authentication and user authentication (using the Axidian CertiFlow MFA adapter) and click Submit.
- Enter PIN and click OK.
Axidian CertiFlow creates a virtual card. The Windows Hello for Business virtual card can be used as a hardware card on user workstations. For example, for domain authentication.
Administrator settings
- Open the Configuration section, navigate to the policy settings, and go to Workflow. Enable the Issue AirCard option in User permissions → General.
- Add the AirCard.xml card type to Axidian CertiFlow.
- Install the AxidianCertiFlow.AirCard.Middleware and AxidianCertiFlow.AirCard.Runtime components on user workstations.
- Configure the Axidian AirCard Enterprise server network availability for user workstations.
You can issue only RSA certificates on AirCards.
After you install the Axidian AirCard Runtime, an AirCard indicator appears in the Windows taskbar.
To issue an AirCard:
- Click Issue AirCard.
- Enter the card name.
- Select Create a new AirCard or select a card created before.
- Click Issue.
After an AirCard is issued, it automatically binds to a workstation. The list of allowed computers is displayed in the card menu.
Connect AirCard to a workstation
You can connect an AirCard to a workstation:
- Automatically in Axidian CertiFlow
After an AirCard is issued, it automatically connects to the authorized computers if they belong to the company’s corporate network. - Manually in the Axidian AirCard Enterprise control panel
Use this method if you cannot connect the card automatically (for example, if the computer is outside the company's network). In this case, only the administrator can issue an AirCard.
How to connect an AirCard manually
Add an AirCard manually in Axidian AirCard Enterprise control panel and connect it to the workstation:
- Open the Axidian AirCard Enterprise control panel.
- Click
 and
and  .
. - In the Code field, enter the code sent by the administrator. The code is valid for an hour and can only be used once. The Axidian AirCard Enterprise server address is set automatically.
- Click Add.
You can view AirCards connected to your workstation in the Active smart cards section of the Axidian AirCard Enterprise control panel. Each card has an ID (serial number) which is displayed in the Axidian CertiFlow services.
You can see the connected cards indicator in the Windows taskbar. If no cards are connected to the workstation, or there is no connection to the Axidian AirCard Enterprise server, the indicator is gray. If at least one card is connected, the indicator is blue.