ESSO Agent
Description
About ESSO Agent
The Axidian Access Enterprise Single Sign-On implements the Single Sign-On uniform login technology in the IT systems. It stores user application passwords centrally and automatically fills in these passwords in hidden form to log in to the required applications or to perform other actions that require authentication. The ESSO Agent facilitates the authentication procedure by eliminating the need to enter the password manually or to change the password on a regular basis.
Supported applications
The Axidian Access Enterprise Single Sign-On technology is used with Windows and Web applications. It is configured without interfering with either server or client part of the target application. Support for a new application requires creating a special template in еру .xml format. The template defines the application forms that can be managed by the Agent. Access management stipulates for repeat of authentication request, filling in the certain fields with account data (username and password), activating of required control elements (clicking the Login button), and recording of the event to log files.
Supported authentication technologies
Enterprise SSO supports alternative authentication technologies, besides the standard one, implemented in most Single Sign-On products - universal master password. These alternative technologies include: two-factor authentication, biometric authentication, certificates, proximity cards, one-time passwords, SMS technologies. Each category of Enterprise SSO users can be configured to use the preset authentication technology only. The following technology combinations are also supported:
- Authentication technology adapted for remote use.
- Multi-factor authentication.
Installation
Installation of the component is carried out at user workstations. Local administrator privileges are required for the component installation.
To deploy the Enterprise SSO Agent at user workstations in automatic mode, you can use the group policy mechanism (Microsoft Group Policy). Otherwise, you can use any other tool that allows batch copying and installation of MSI packages to user workstations, such as Microsoft System Center Configuration Manager.
- Run the Enterprise SSO.Agent.msi file and follow the Installation wizard instructions.
- After the installation is complete, restart the system restart. Click Yes to restart the system immediately or No if you plan to do this later manually.
Files for the SSO Agent installation are located at Enterprise SSO\<version number>\*.
- ESSO.Agent.en-us.msi: Installation package for SSO Agent on 32 bit OS.
- ESSO.Agent.x64.en-us.msi: Installation package for SSO Agent on 64 bit OS.
Setting up connection to Axidian Access Core Server
Configuration through Windows Registry Editor
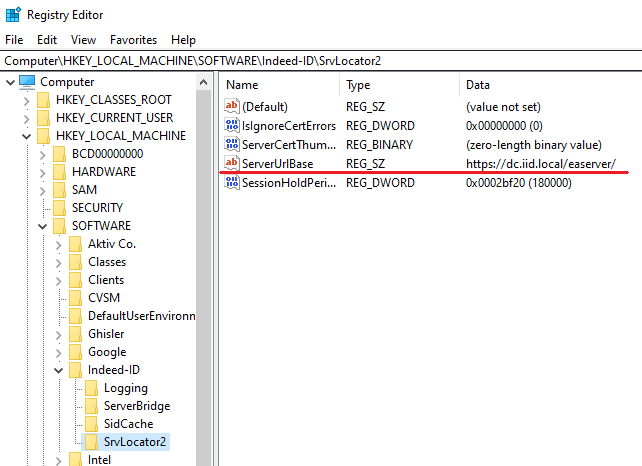
- Open Windows Registry Editor (regedit).
- Go to HKEY_LOCAL_MACHINE\SOFTWARE\Axidian-ID\SrvLocator2.
- Locate string parameter
ServerUrlBaseand set your Axidian Access Core Server URL, such as http(s)://dc.axidian-id.local/am/core/.
Configuration through Windows Group Policies
Group Policy Templates are located at Axidian\Misc\GroupPolicyTemplates.
Add policy AxidianID.ServerUrl.admx to the workstation where Windows Logon is installed.
Open gpedit.msc and navigate to Computer Configuration - Administrative templates - Axidian ID - Client Connection - Server connection settings.
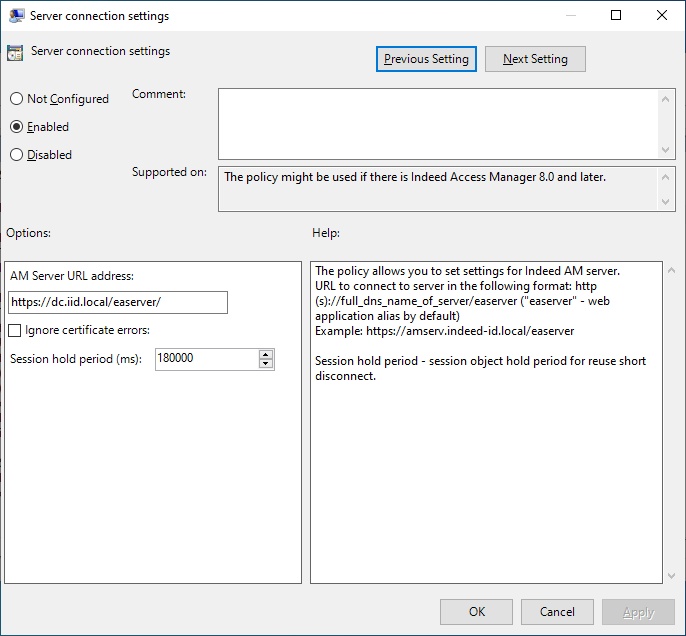
Enable the policy.
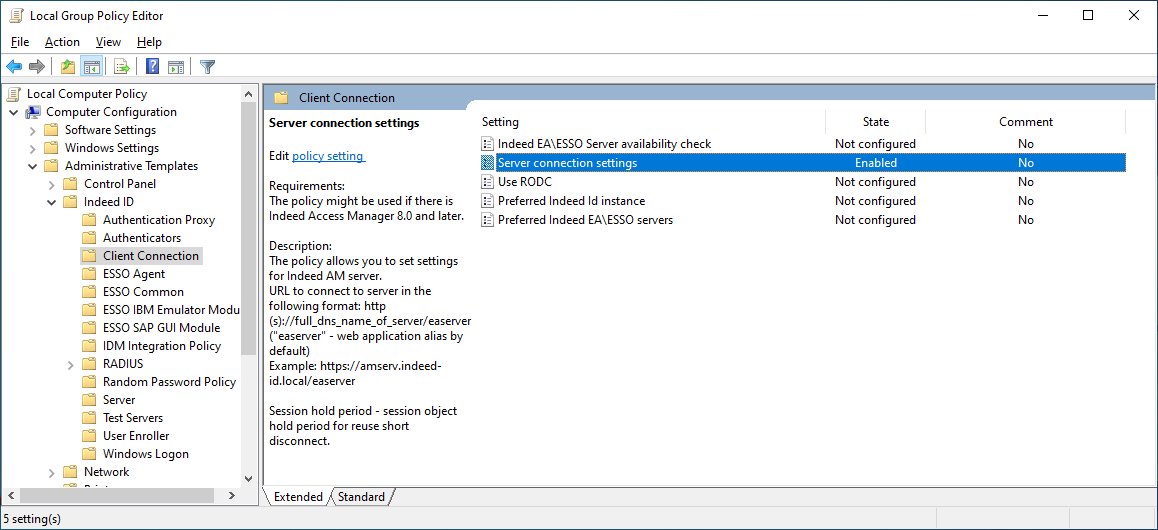
- In field Core Server URL address set your Core Server URL, such as http(s)://dc.axidian-id.local/am/core/.
Configuring the ESSO web plugin
AM ESSO Agent uses web plugin for Internet Explorer, Mozilla Firefox and Google Chrome browsers when working with web applications.
Internet Explorer
The Enterprise SSO Helper for Internet Explorer add-on is installed along with the AM ESSO Agent. To use the add-on, activate it in your browser. If the add-on does not appear in the browser after you install ESSO Agent, perform the following steps:
Navigate to Internet options -> Advanced -> Browsing and activate the Enable third-party browser extensions option.
For server operating systems, in addition to item 1, navigate to Server manager -> Loсal server and disable Internet Explorer Enhanced Security Configuration (IE ESC).
For bulk changing of Internet Explorer add-on parameters, use the Windows group policies.
The required policies are located in Local Group Policy Editor (gpedit.msc), section User Configuration\Administrative Templates\Windows Components\Internet Explorer*.
Activate the Automatically activate newly installed add-ons policy to enable web plugin automatically.
To prohibit add-on deactivation by users, disable the Do not allow users to enable or disable add-ons policy.
Mozilla Firefox
The ESSO extension is installed along with the ESSO Agent. To use the extension, activate it in your browser.
The ESSO extension is installed manually or automatically through Windows group policies.
Installation from Chrome Web store
- Install the ESSO Agent at the workstation with access to Internet.
- Run Google Chrome.
The extension is downloaded automatically within 1 minute. After the extension is downloaded, access to Internet is not required anymore. Activate the extension in the browser.
Download and activate the extension for every Windows user session. If you remove the extension from the browser manually, you must download it again from the Chrome Web store.
The Axidian ESSO Extension is available at https://chrome.google.com/webstore/detail/indeed-id-esso/lcjenjmcehnkfkghcflkfialplejjkdj
Installation through Windows Group Policies
The ESSO propagated by group policies is installed for all users of the workstation. Internet access is not required for the installation.
To configure a group policy to install the ESSO extension, perform the following steps:
Create a web application with arbitrary name, such as
chromeplugin.In IIS Manager, define the DefaultAppPool application pool and Anonymous Authentication for it.
Place the lcjenjmcehnkfkghcflkfialplejjkdj.crx and update.xml files in the application folder. These files are located in the Enterprise Single Sign-On\\Misc\ChromePlugin folder of the installation package.
In the MIME Types section of the website with
chromepluginapplication, add a new type with the .crx extension and application/chrome description.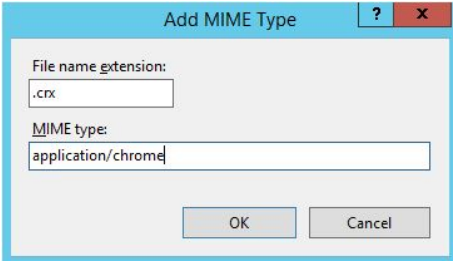
Configure a secure https connection for the
chromepluginapplication and make sure that it is reachable from user workstations.Add the adm/admx templates to local/central administrative template storage of domain controller and create a new group policy object with an arbitrary name in the Group Policy Management instrument.
Open the created object for editing and navigate to Computer Configuration -> Administrative Templates -> Google -> Google Chrome -> Extensions section.
Enable the Configure the list of force-installed apps and extensions policy and define the application identifier (indicated in the .crx file name) and path to the .xml file in the folder of
chromepluginweb application, created at step 3. Save the changes.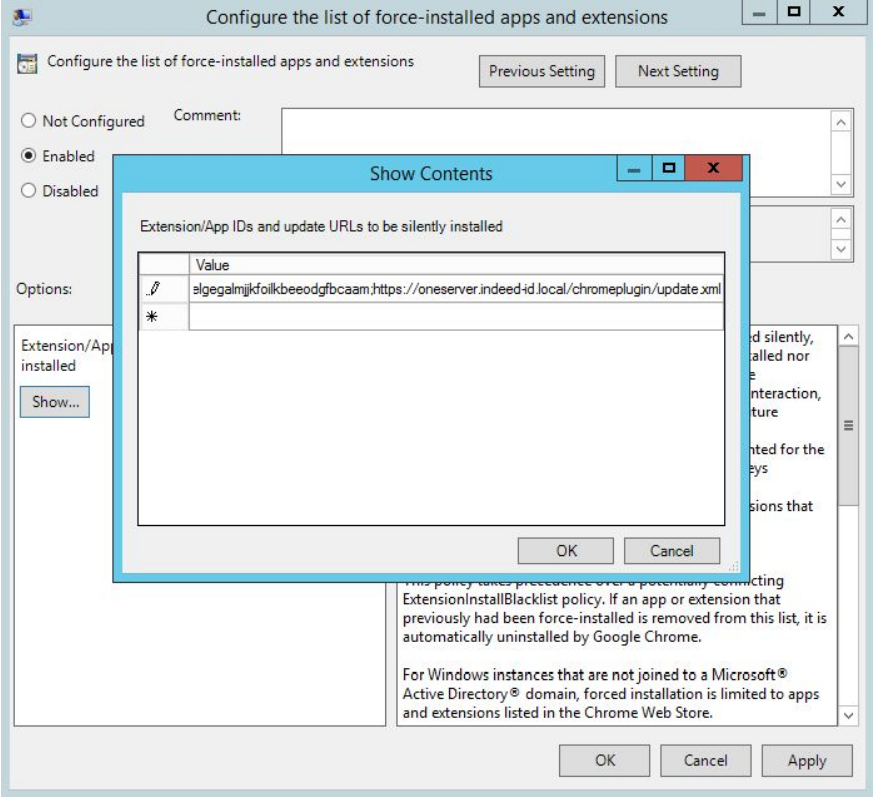
Enable the Configure extension, app, and user script install sources policy and indicate the address of the server, where the
chromepluginweb application is deployed. Save the changes.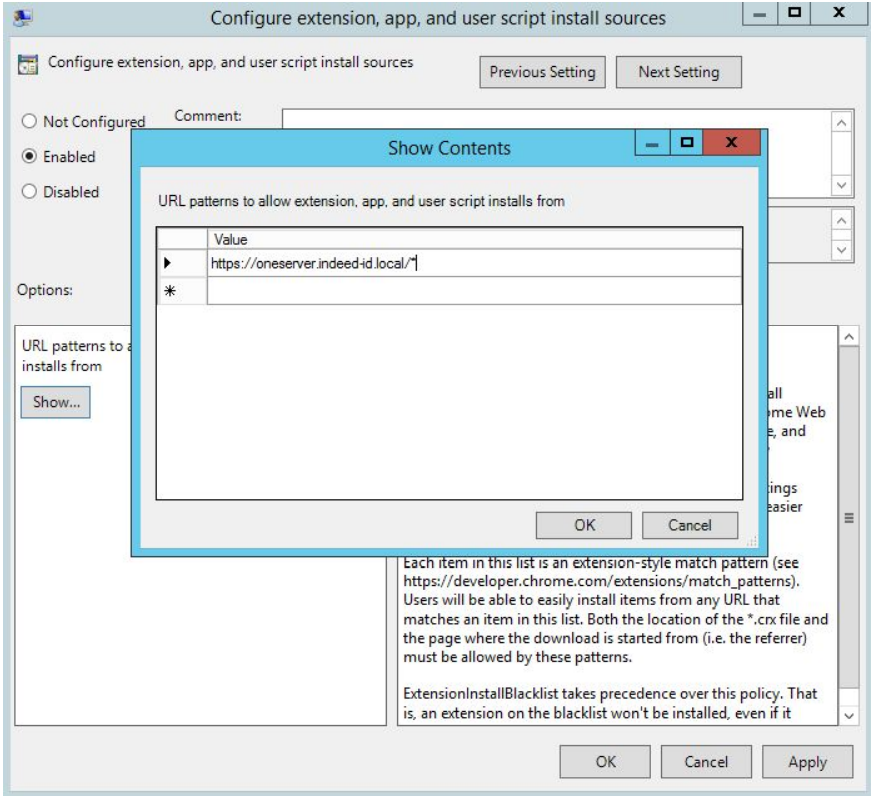
Set the group policy object scope to user workstations with ESSO Agent installed.
The extension is downloaded and installed automatically after the group policy is applied to the workstation. It might take up to several minutes for the extension to appear in the installed extension list. The extension installed through group policies is marked with the special symbol
 .
.
Enterprise Single Sign-On task
The Enterprise Single Sign-On task includes:
- Monitoring of the application start.
- Automatically filling in fields and forms with data required to access the application, such as username, password.
Automatic filling up takes place only after user identity verification with the supported authentication technology. Thus, Enterprise Single Sign-On spares the users the need to memorize, write down, store, and enter passwords manually to login to an application. Due to centralized storage of SSO profiles, users can access their applications from any workstation with ESSO Agent installed.
As ESSO Agent supports the authentication technologies adapted for terminal environment and not requiring additional equipment, it can be used on virtually any computer, including thin clients on the basis of Windows CE, Linux, Wyse.
Uniform login to applications using the Axidian Access authentication technology
Access to applications using an authenticator is possible after you configure the application account, user profile and register an authenticator itself. To access the application using the Axidian Access authentication technology, perform the following steps:
Log in to the workstation. The taskbar shows a popup notification of SSO session start.
ESSO Agent starts up automatically when you log in to the operating system. To start it manually, in Programs menu, select Axidian > Enterprise SSO > Enterprise SSO - Agent.
Select your target application
To select the target application, perform one of the following procedures:
- Press [Ctrl]+[Alt]+[Q] or run the Enterprise SSO Agent application by double-clicking the Axidian icon in the Windows notification bar.
- Open the Axidian - ESSO Agent context menu by right-clicking the Axidian icon in the Windows notification bar and select Quick start....
The Select an application window shows the applications that are available to run with ESSO Agent. The appearance of the Quick start... window is configured in the ESSO applications settings.
If one target application has numerous SSO accounts, you need to select an application and then select an account for it.
If an application contains several components, then executable files of each component are grouped under a single name in the quick launch panel for more convenience.
Authentication
To authenticate in an application, perform the following steps:
Select the username and login method. By default, the operating system offers the last method used. Follow the on-screen instructions and provide the authenticator when prompted. If you have several authenticators, you can use any of those.
To select an authenticator, click Switch authentication method.
After authentication, the login window of the target application appears. The Username and Password fields are automatically filled in with the data defined when you create the SSO account.
Then login to application is performed. Besides automatic filling in, you can also enter credentials manually. Username and password, entered upon the first login to application, are stored and filled in automatically upon the next login attempt. If authentication is cancelled, then login to application is not performed. The current application form or the application itself is closed.
If an administrator defines that the application can be started using ESSO Agent only and authentication is required to log in to application, then authentication cancellation results in error message.
Access to target applications is regulated by administrative settings. Some applications can be prohibited by the ESSO administrator. These applications are not available in the Select an application window of ESSO Agent. An attempt to run the prohibited application results in the following error message:
A device attached to the system is not functioning.
Changing of user accounts
To change ESSO account, perform the following steps:
Login to the operating system and open the context menu of ESSO Agent:
- Press [Ctrl]+[Alt]+[Q] or run the Enterprise SSO Agent application by double-clicking the Axidian icon in the Windows notification bar.
- Open the Axidian - Enterprise ESSO Agent context menu by right-clicking the Axidian icon in the Windows notification bar and select Switch user....
In the Login to SSO window select the required user account or Automatic identification item, if it is enabled.
Perform authentication with the authenticator for the selected user account. If authentication is successful, the ESSO Agent opens an ESSO session for the user.
Password management
The Enterprise Single Sign-On provides for regular password change in applications. Usually the password is changed automatically. Manual change of password by user is regulated by ESSO administrator settings. If manual password change is allowed, then upon the next password change its value is not generated automatically, but the user is prompted to enter it. The system behavior upon requesting a new password from user depends on the type of Enterprise SSO user account, defined by SSO administrator:
If the administrator configured manual password change by user, then the following window appears for password change.
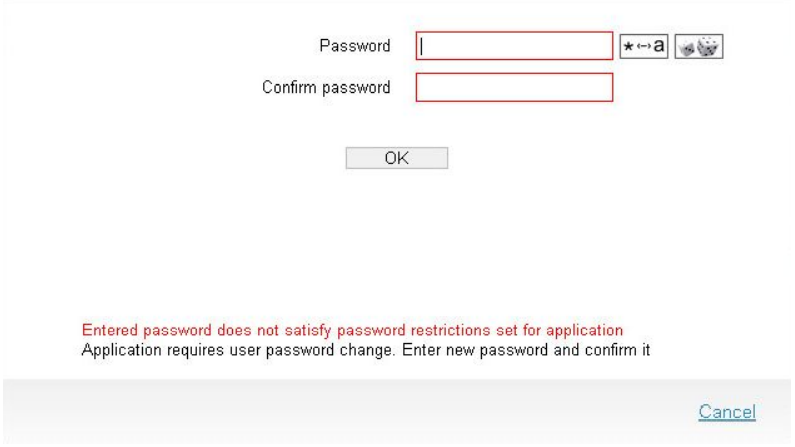
- Password entering mode (password is hidden/password is revealed) is regulated by clicking the
 button (Reveal password).
 - Clicking the
 button (Generate a random password) results in automatic password generation in accordance with the restrictions set for this application. The generated password is automatically pasted into the Password field. The Reveal password option is then enabled and Password confirmation field is cleared.
The new password entered in the standard manner is checked for compliance with password security criteria set for the application. An error message appears, if the password does not comply with the required criteria.
ESSO Agent commands
In the Windows notification bar, right-click the Axidian - ESSO Agent icon to view following commands:
Change user: Use to select a different account to access the application. This command opens the SSO Login window showing the list of available accounts. Login method selection is also possible. The last method used is selected by default.
Deactivate hotkeys: This command deactivates the following key combinations:
[Ctrl]+[Alt]+[Q]: Opens the quick start window.
[Ctrl]+[Alt]+[U]: Performs ESSO data update.
[Ctrl]+[Alt]+[R]: Performs forced processing of the application form (re-matching).
All the combinations are enabled by default.
Update data: Use to modify the SSO profile.
Quick start: Performed when the corresponding item from the context menu of ESSO Agent is selected or if you press [Ctrl]+[Alt]+[Q] keys. Use this command to open the Select an application window with the list of applications available.
Application is not displayed in the list, if ESSO Agent cannot find its executable file at the user workstation.
Error processing
If an error occurs (for instance, form filling error), the ESSO Agent provides for selection of action to process the error. The following options are available in the Error processing window (it is closed automatically after an option is selected):
- Repeat: The operation resulted in error is performed again.
- Close application: The application that triggered an error is closed. All unsaved data is lost.
- Close window: This closes the current window or form of target application. If it is the main window of the application, it might close.
- Ignore: No action is performed.